Gitops and EnMasse
With the EnMasse 0.28.0 release, using a Gitops workflow to manage your messaging application is even easier than before. This article explores the service model of EnMasse and how it maps to a Gitops workflow.
Gitops is a way to do Continuous Delivery where not only the source code of an application, but all configuration of an application is stored in git. Changes to a production environment involve creating a pull/change requests to a git repository. Once the PR has been tested and reviewed, it can be merged. When merged, a CD job is triggered that will apply the current state of the git repository to the system. There are variants of this where you run A/B testing and so on, the sky is the limit!
The declarative nature of the “gitops model” fits well with the declarative nature of Kubernetes. You can store your Kubernetes configuration in git, and trigger some process to apply the configuration to a Kubernetes cluster. If you store your application code together with the Kubernetes configuration, you enable development teams to be in full control of their application deployment to any cluster environment.
Traditionally, Kubernetes has mainly been used for stateless services. Stateful services are usually running outside the Kubernetes cluster. If a development team wants to use a stateful service, the team normally have to install and manage the service themselves or use a cloud provider service. This is changing with the introduction of all sorts of operators for Postgresql, Kafka, Elasticsearch etc.
EnMasse is an operator of a stateful messaging service that runs on Kuberentes, with the explicit distinction that the responsibility of operating the messaging service is separate from the tenants consuming it. This makes it easy for an operations team to use the gitops model to manage EnMasse, and for the development teams to use the gitops model to manage their messaging configuration.
Lets assume that you have a team in your organization managing the messaging infrastructure using EnMasse on Kubernetes or OpenShift, and that you have 2 independent developer teams that both want to use messaging in their applications. The following diagram describes the flow:
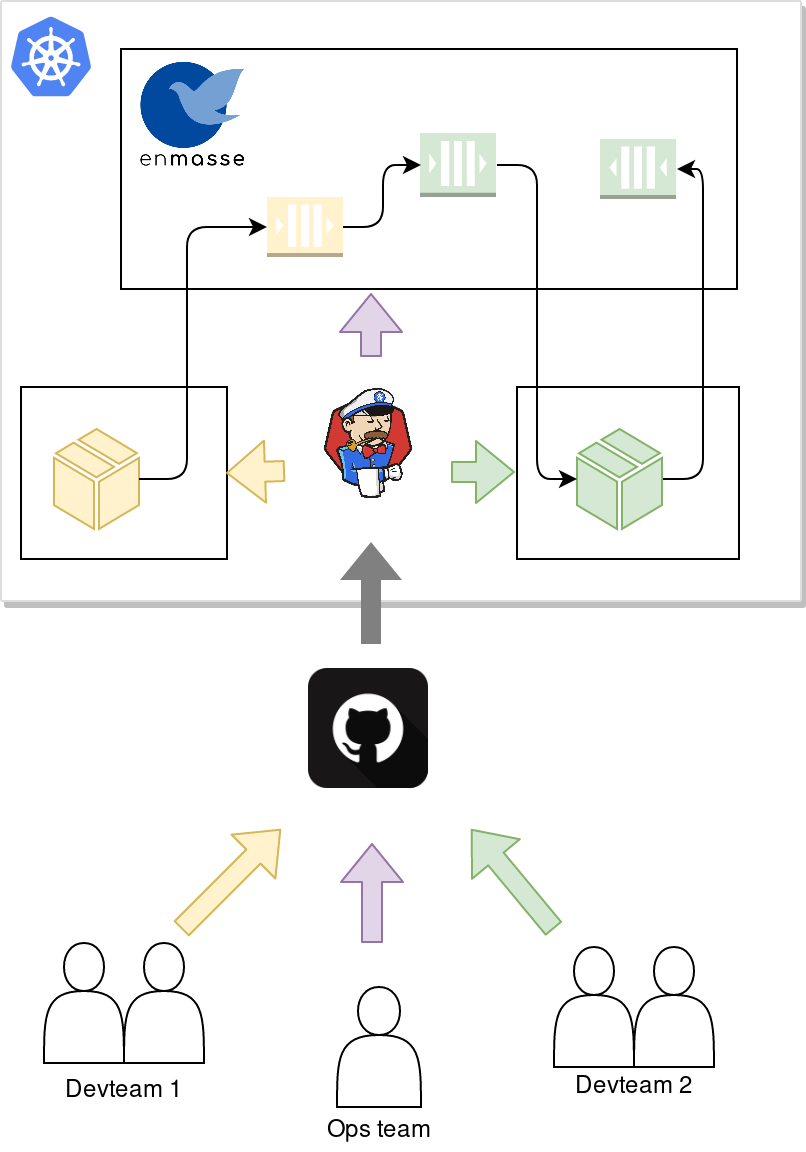
The operations team will deploy the messaging infrastructure (EnMasse), and commit the desired configuration templates that they want to support to git. A CI process then applies the EnMasse configuration to the cluster.
Independently of the operations team, the development teams commit their application code along with the messaging resource manifests, such as AddressSpace, Address and MessagingUser (we will get back to what these are), for their application. A CI process builds the applications and applies the application and messaging resources manifests.
Operations
For the operations team, managing EnMasse in git can be as simple as unpacking the release bundle and committing the parts that is used for a particular installation. In addition, the messaging configuration and available plans must be configured. A sample of the minimal amount of configuration needed can be found here.
Development teams
Application
First, lets create a simple messaging application. Writing messaging clients can be a challenging task, as its asynchronous by nature. The vertx-amqp-client allows you to write simple reactive AMQP 1.0 clients. The following example shows how the application can get all its configuration from the environment:
    Vertx vertx = Vertx.vertx();
    AmqpClientOptions options = new AmqpClientOptions()
        .setSsl(true)
        .setPemKeyCertOptions(new PemKeyCertOptions()
            .addCertPath(""/var/run/secrets/kubernetes.io/serviceaccount/ca.crt"))
        .setHost(System.getenv("MESSAGING_HOST"))
        .setPort(Integer.parseInt(System.getenv("MESSAGING_PORT")))
        .setUsername("@@serviceaccount@@")
        .setPassword(new String(Files.readAllBytes(Paths.get("/var/run/secrets/kubernetes.io/serviceaccount/token")), StandardCharsets.UTF_8));

    AmqpClient client = AmqpClient.create(vertx, options);
    client.connect(ar -> {
            if (ar.succeeded()) {
                AmqpConnection connection = ar.result();

                connection.createSender("confirmations", done -> {
                    if (done.succeeded()) {
                        AmqpSender sender = done.result();
                        connection.createReceiver("orders"), order -> {
                            // TODO: Process order
                            AmqpMessage confirmation = AmqpMessage.create().withBody("Confirmed!").build();
                            sender.send(confirmation);
                        }, rdone -> {
                            if (rdone.succeeded()) {
                                startPromise.complete();
                            } else {
                                startPromise.fail(rdone.cause());
                            }
                        });
                    } else {
                        startPromise.fail(done.cause());
                    }
                });
            } else {
                startPromise.fail(ar.cause());
            }
        });
For full example clients, see example clients.
Messaging resources
Once your application written, some configuration for using the messaging resources available on your cluster is needed.
An EnMasse AddressSpace is a group of addresses that share connection endpoints as well as authentication and authorization policies. When creating an AddressSpace you can configure how your messaging endpoints are exposed:
apiVersion: enmasse.io/v1beta1
kind: AddressSpace
metadata:
  name: app
  namespace: team1
spec:
  type: standard
  plan: standard-small
  endpoints:
  - name: messaging
    service: messaging
    cert:
      provider: openshift
    exports:
    - name: messaging-config
      kind: ConfigMap
For more information about address spaces, see the address space documentation.
Messages are sent and received from an address. An address has a type that determines its semantics, and a plan that determines how much resources is reserved for this address. An address can be defined like this:
apiVersion: enmasse.io/v1beta1
kind: Address
metadata:
  name: app.orders
  namespace: team1
spec:
  address: orders
  type: queue
  plan: standard-small-queue
To ensure that only trusted applications are able to send and receive messages to your addresses, a messaging user must be created. For applications running on-cluster, you can authenticate clients using a Kubernetes service account. A serviceaccount user can be defined like this:
apiVersion: user.enmasse.io/v1beta1
kind: MessagingUser
metadata:
  name: myspace.app
  namespace: team1
spec:
  username: system:serviceaccount:team1:default
  authentication:
    type: serviceaccount
  authorization:
  - operations: ["send", "recv"]
    addresses: ["orders"]
With the above 3 resources, you have the basics needed for an application to use the messaging service.
But how does your application get to know the endpoints for its address space? You may have noticed the exports field in the addres space definition. Exports are a way to instruct EnMasse that you want a configmap with the hostname, ports and CA certificate to be created in your namespace. To allow EnMasse to create this resource, we also need to define a Role and RoleBinding for it:
---
apiVersion: rbac.authorization.k8s.io/v1
kind: Role
metadata:
  name: messaging-config
  namespace: team1
spec:
rules:
  - apiGroups: [ "" ]
    resources: [ "configmaps" ]
    verbs: [ "create" ]
  - apiGroups: [ "" ]
    resources: [ "configmaps" ]
    resourceNames: [ "messaging-config" ]
    verbs: [ "get", "update", "patch" ]
---
apiVersion: rbac.authorization.k8s.io/v1
kind: RoleBinding
metadata:
  name: messaging-config
  namespace: team1
roleRef:
  apiGroup: rbac.authorization.k8s.io
  kind: Role
  name: messaging-config
subjects:
- kind: ServiceAccount
  name: address-space-controller
  namespace: enmasse-infra
Wiring configuration into application
With messaging configuration in place we can write the deployment manifest for our application:
apiVersion: apps/v1
kind: Deployment
metadata:
  name: myapp
  labels:
    app: myapp
spec:
  replicas: 1
  template:
    metadata:
      matchLabels:
        application: demo
    spec:
      containers:
        - name: app
          image: myapp:latest
          env:
            - name: MESSAGING_HOST
              valueFrom:
                configMapKeyRef:
                  name: messaging-config
                  key: service.host
            - name: MESSAGING_PORT
              valueFrom:
                configMapKeyRef:
                  name: messaging-config
                  key: service.port.amqps
As you can see, the values of the configmap is mapped as environment variables to our application.
Summary
We have seen how an operations team and a set of development teams can manage messaging as Kubernetes manifests. This allows your whole organisation to follow the gitops model when deploying your applications using messaging on Kubernetes and OpenShift.
Building containers on Travis CI using Podman
Since Podman and Buildah appeared on my radar, I’ve been wanting to try replacing docker. Podman is a replacement for docker, whereas buildah is a replacement for docker build. Although docker works OK, I’ve seen various issues with different versions of docker not working with Kubernetes and OpenShift, and that the local docker daemon sometimes becomes unresponsive and causes build failure in the EnMasse CI. Since podman and buildah does not use a local daemon for building images, they will work without root privileges.
The main difference between podman and buildah from a user perspective is that the podman has a wider feature set than buildah, and the podman cli is almost 1:1 with docker. Podman also has the ability to run containers and generate Kubernetes manifests, whereas buildah is focused only on building container images.
Using podman on Travis CI is somewhat a challenge, for a few reasons:
- Podman is not available in the default Ubuntu repositories and a newer version of Ubuntu than the default travis one is needed
- Podman assumes a Fedora/CentOS/RHEL container configuration (/etc/containers/registries.conf)
So to replace docker with podman, ensure you have the following set in your .travis.yml:
dist: xenial
before_install:
- sudo add-apt-repository -y ppa:projectatomic/ppa
- sudo apt-get update -qq
- sudo apt-get install -qq -y software-properties-common podman
- sudo mkdir -p /etc/containers
- sudo sh -c 'echo -e "[registries.search]\nregistries = [\"docker.io\"]" > /etc/containers/registries.conf'
The last 2 lines are necessary for podman to be able to fetch images from Docker Hub.
In your build scripts, you can replace docker with podman, and thats it!
Setting up EnMasse on AWS EC2
Note: The latest version of this guide can be found at github
As I was preparing a demo for my presentation at the RivieraDev next week, I wrote a guide for setting up EnMasse on AWS in the same way as I am doing for the demo. This is not even very specific to AWS, so you can probably modify the configuration to fit Microsoft Azure or even Google GCE.
The end result from this guide is an instance of EnMasse suitable for development and/or experimentation, and should not be considered a production ready setup. For instance, no persistence is configured, so neither messages in brokers nor state in other components like hawkular are persisted.
Prerequisites
First, you must have created an EC2 instance. EnMasse runs on OpenShift and Kubernetes, but this post uses OpenShift purely for convenience. Have a look at the OpenShift prerequisites for the required hardware configuration. The installation will be done using Ansible, so make sure Ansible is installed on laptop or workstation.
Configure Ansible to handle passwordless sudo
For EC2 instance, the default is a passwordless sudo, and Ansible (2.3.0.0 at the time of writing) requires a minor configuration modification to deal with that. On the host you will be running ansible from, edit /etc/ansible/ansible.cfg, and make sure that the sudo_flags parameter is set to -H -S (remove the -n).
Setting up OpenShift
Once Ansible is setup, installing OpenShift is easy. First, an inventory file with the configuration
and the hosts must be created. Save the following configuration to a file, i.e. ansible-inventory.txt:
[OSEv3:children]
masters
nodes

[OSEv3:vars]
deployment_type=origin
openshift_master_identity_providers=[{'name': 'htpasswd_auth', 'login': 'true', 'challenge': 'true', 'kind': 'HTPasswdPasswordIdentityProvider', 'filename': '/etc/origin/master/htpasswd'}]
openshift_master_default_subdomain=<yourdomain>
openshift_public_hostname=openshift.<yourdomain>
openshift_hostname=<ec2 instance hostname>
openshift_metrics_hawkular_hostname=hawkular-metrics.<yourdomain>

openshift_install_examples=false
openshift_hosted_metrics_deploy=true

[masters]
<ec2 host> openshift_scheduleable=true openshift_node_labels="{'region': 'infra'}"

[nodes]
<ec2 host> openshift_scheduleable=true openshift_node_labels="{'region': 'infra'}"
This will configure OpenShift so that it can only be accessed by users defined in /etc/origin/master/htpasswd.
If you don’t have a domain with wildcard support, you can replace
You can now download the ansible playbooks. The simplest way to do this is to just clone the git repository:
git clone https://github.com/openshift/openshift-ansible.git
To install OpenShift, run the playbook like this
ansible-playbook -u ec2-user -b --private-key=<keyfile>.pem -i ansible-inventory.txt openshift-ansible/playbooks/byo/openshift-cluster/config.yml
This command will take a while to finish.
Creating a user
To be able to deploy EnMasse in OpenShift, a user must be created. Log on to your EC2 instance, and create the user:
htpasswd -c /etc/origin/master/htpasswd <myuser>
Where <myuser> is the username you want to use. The command will prompt you for a password that
you will later use when deploying EnMasse.
Creating certificates
To be able to access your EnMasse cluster outside OpenShift, you must create a certificate for it. For testing purposes, you can create a self-signed key and certificate like this:
openssl req -new -x509 -batch -nodes -out server-cert.pem -keyout server-key.pem
Setting up EnMasse
You can find the latest version of EnMasse here. To deploy EnMasse, it is recommended to use the deploy script together with a template of the latest version. At the time of writing, the latest version is 0.9.0, which can be deployed as follows:
curl -L https://github.com/EnMasseProject/enmasse/releases/download/0.9.0/enmasse-deploy.sh -o enmasse-deploy.sh
bash enmasse-deploy.sh -c https://openshift.<yourdomain>:8443 -p enmasse -t https://github.com/EnMasseProject/enmasse/releases/download/0.9.0/enmasse-template.yaml -u <myuser> -k server-key.pem -s server-cert.pem -p enmasse
Now you have EnMasse deployed and ready to use. The endpoints will be:
* AMQP: `messaging-enmasse.<yourdomain>`
* MQTT: `mqtt-enmasse.<yourdomain>`
* Console: `console-enmasse.<yourdomain>`
The console can be used for creating and deleting addresses. You should be able to use any AMQP or MQTT client that supports TLS to send and receive messages.
(Optional) Setting up metrics
The process for setting up grafana is a bit more involved, but it gives you a nice overview of whats
going on over time. First of all, I like to setup everything metric-related in the openshift-infra
project. To do that, you must first give your user permission sufficient privileges. In this setup,
since it’s not a production setup, I grant cluster-admin privileges for simplicity (requires logging
into the ec2 instance):
oadm --config /etc/origin/master/admin.kubeconfig policy add-cluster-role-to-user cluster-admin developer
With this in place, you can setup the hawkular-openshift-agent which pulls metrics from routers and brokers:
oc create -f https://raw.githubusercontent.com/openshift/origin-metrics/master/hawkular-agent/hawkular-openshift-agent-configmap.yaml -n openshift-infra
oc process -f https://raw.githubusercontent.com/openshift/origin-metrics/master/hawkular-agent/hawkular-openshift-agent.yaml IMAGE_VERSION=1.4.0.Final | oc create -n openshift-infra -f -
oc adm policy add-cluster-role-to-user hawkular-openshift-agent system:serviceaccount:openshift-infra:hawkular-openshift-agent
If everything is setup correctly, you can then deploy Grafana:
oc process -f https://raw.githubusercontent.com/hawkular/hawkular-grafana-datasource/master/docker/openshift/openshift-template-ephemeral.yaml -n openshift-infra | oc create -n openshift-infra -f -
After some time, Grafana should become available at oc get route -n openshift-infra -o jsonpath='{.spec.host}' hawkular-grafana. The default username and password is admin/admin.
Summary
In this post, you’ve seen how to:
* Deploy OpenShift on an AWS EC2 instance
* Deploy EnMasse cloud messaging
* Deploy Grafana for monitoring
If you have questions regarding the setup, don’t hesitate to get in touch on twitter, e-mail me directly, or post on the EnMasse mailing list.
Messaging as a Service
Inspired by a great blog post by Jakub Scholz on “Scalable AMQP infrastructure using Kubernetes and Apache Qpid”, I wanted to write a post about the ongoing effort to build Messaging-as-a-Service at Red Hat. Messaging components such as the Apache Qpid Dispatch Router, ActiveMQ Artemis and Qpidd scales well individually, but scaling a large deployment can become unwieldy. As Scholtz demonstrates, there are a lot of manual setup when creating such a cluster using kubernetes directly.
The EnMasse project was created to provide the required tools and services for deploying and running a messaging service on Openshift. Running on Openshift means you can either run EnMasse on your own instance or in the cloud. You can also run EnMasse on Openshift Origin, which is the upstream community project. The long term goals with this project is to build a messaging service with the following properties:
- Different communication patterns like request-response, pub-sub and events
- Store-and-forward semantics
- Support for a variety of different protocols like AMQP, MQTT, HTTP(1.1 & 2), CoAP and STOMP
- Multi-tenancy
- Scalability
- Elasticity without disruption
The rest of this post will try to give an initial overview of EnMasse. EnMasse is still under development, so a lot of the features mentioned may not be implemented or they are work in progress.
EnMasse can be configured with a list of addresses. Each address can have 4 different semantics in EnMasse:
- Anycast: Messages go from a client, through the router network, to another client connected to the router network on the same address.
- Broadcast: Messages go from a client, through the router network to all clients connected to the router network on the same address.
- Queue: Messages go from a client to a queue. Another client can read the message from the queue at a later point.
- Topic: Aka. pub/sub. Messages go from a publisher client to multiple clients subscribed to the same address.
EnMasse is composed of the router network, the broker clusters, and the cluster admin components. The router network and the broker clusters handle messages, while the cluster admin components handles the router and broker configuration.

EnMasse contains two configuration files, address and flavor. The configuration files are stored as JSON within openshift as configmaps. The flavor configuration contains the supported variants of broker and router configurations. The address configuration contains the addresses the cluster should be able to handle and their desired semantics such as store-and-forward, multicast and the flavor type. The intention is that the cluster administrator is responsible for the available flavors, while the developer only has to care about which addresses to configure.
The main components of EnMasse are the router, broker and the cluster admininistration components.
Router
EnMasse uses the Apache Qpid Dispatch Router to scale the service in terms of the number of connections it can handle as well as the throughput. The router also hides the brokers from the client so that the brokers themselves may be scaled, moved, upgraded and changed without the client noticing.
Broker
EnMasse creates broker clusters for queue and topic addresses. At present, EnMasse only supports ActiveMQ Artemis (or Red Hat JBoss A-MQ) as the message broker, though other brokers might be supported in the future. The brokers can also be scaled in the same way as routers, and EnMasse will ensure the cluster is configured correctly.
Cluster administration
EnMasse contains several cluster administration components that manages the router and broker configuration:
- The configuration service provides a way for the router agent and the subscription service to subscribe for a list of all addresses configured in EnMasse.
- The router agent is responsible for configuring the network of routers based on the address configuration.
- The subscription service is responsible for managing durable subscriptions so that a reconnecting client will transparently connect to the same broker.
- The storage controller is responsible for creating, reconfiguring and deleting broker clusters based on two configuration files stored as openshift config maps. This component can be omitted, but will ease the maintenance when you want to configure multiple addresses.
I will try to write more articles about EnMasse as we are progressing with new features and improvements. For now, you can easily get started by following the github example. Do not hesitate to report bugs, and all contributions are always welcome.
Performance mindset
You’ve all heard it, and you all know it: premature optimizations are the root of all evil. But what does that mean? When is an optimization premature? I’ve come to think of this sort of ‘dilemma’ many times at work, where I see both my self and coworkers judging this by different standards.
Some programmers really don’t care about performance at all. They write code that looks perfect, and fix performance issues as they come. Others think about performance all the time, where they will happily trade good software engineering principles for improved performance. But I think that thinking about performance in both of these ways are wrong. Performance is about simple and ‘natural’ design.
Let me give one recent example from work. A few months back, we rewrote parts of our software to get new features. Most importantly this involved a new protocol to be used between some client and server. After a while, users of our software were complaining about a server process consuming an unreasonable amount of memory. After profiling the server in question, we found that they were right: there was no need for that process to use that much memory. While profiling, we found a lot of things consuming an unecessary amount of memory, but the most important of them was that some large piece of data was copied many times before sending it through the cable.
Why did we write software like that? Well, while writing the new protocol we thought that it didn’t matter. The data was typically not that big, and the server could handle the load fairly well according to benchmarks. Turns out that the user was serving much more data through that server than we anticipated. Luckily, increasing the JVM heap size made things go around, so it was no catastrophe.
We set off to fix it, and the amount of ‘garbage’ created was much less and memory usage improved significantly. But to get there, we had to introduce a new version of our protocol and refactor code paths to be able to pass data through the stack without copying. It was no more than 5 days of work, but those days could probably have been spent doing more useful things.
But surely, you’d expect the code to become horrible, full of dirty hacks and as unmaintainable as OpenSSL? Actually, it didn’t. The refactorings and protocol changes did not worsen the state of our software. In fact, the design became better and more understandable, because we had to think about how to represent the data in a fashion that reduced the amount of copying done. This gave us an abstraction that was easier to work with.
Premature optimizations are really evil if they make your software harder to read and debug. Optimizations at the design level on the other hand, can save you a lot of trouble later on. I am under the impression that a lot of software is written without a ‘performance mindset’, and that a lot of manpower is wasted due to this. If we used 1 day to properly think through our protocol and software design in terms of data flow, we could spend 4 days at the beach drinking beer.
I like beer.